Last Updated on 2022-03-01 by Harry Masterton

I wanted to know how to dry wood fast for woodworking because my neighbor had an old outlying building he was tearing down. Learning how to dry wood fast for woodworking will let you build using lumber that you might not otherwise have, and it can save you money!
How To Dry Wood Fast For Woodworking.
What is the fastest way to dry wood for woodworking?
You can experiment with how to quickly dry out wood, but I have found that using an oven (kiln) is the fastest method. A wood kiln offers several advantages over standard air-drying, like:
- Additional heat: As you research various methods on how to dry wood fast for woodworking, a common element is the use of heat;
- Proper airflow: Outside of applying heat, circulating air is how to dry out wood fast;
- Low humidity: What is the fastest way to dry wood for woodworking? Set the wood in a dry environment like a wood kiln with a dehumidifier.
Since a wood kiln is the quickest method for anyone learning how to dry wood fast for woodworking, most hobbyists build a kiln at home or pay extra for kiln drying space at a lumber yard.
As I researched how to quickly dry out wood at home, I found several blogs and videos showing others building their wood drying kilns. As you plan how to dry out wood fast in your shop, I suggest using a temporary setup that you can place in a basement, garage, or medium-sized space.
Wood kilns are the best solution when figuring out how to dry wood fast for woodworking projects, but remember that timber size is limited by what the wood kiln's capacity.
How do you make wet wood dry faster?

Steps on how do you make wet wood dry faster include:
- Rough saw logs as soon as possible: I would suggest rough-cutting timber when you get it home. That opens up more square inches of the wood face while reducing its thickness;
- Seal the ends of your green lumber: As soon as you finish rough sawing, you need to seal the ends of each board. That prevents the ends from drying too quickly and cracking as the rest of the wood catches up;
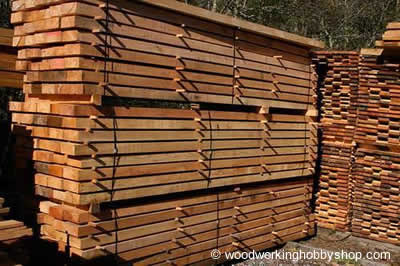
- Stack wood evenly where possible: I find that I get more surface exposure on my lumber's surfaces if I stack them neatly. Even spacing between boards and lumber of similar length seems to produce the best airflow around the pile;
- Monitor moisture content: I have a meter that allows me to check each piece of wood. Regular monitoring identifies issues, either with the pile or the location of the wood.
Learning how to dry wood for woodworking is simple once you establish a location and a preferred system. Combining several tricks and techniques is how to dry wood fast for woodworking.
How to season wood for woodworking
As you research how to dry wood fast for woodworking at home, you will come across terms like wood drying, seasoning lumber, or seasoning wood. These terms refer to the same thing; moisture reduction in your lumber.
I have found several how to season wood for woodworking to create a moisture balance between wood and the surrounding environment. Woodworkers dry their green and wet woods using:
- Air dry: This is a slow process of exposing wood to air. It is a cheap method that produces good results, but it can take a year for every inch of thickness to establish equilibrium;
- Kiln dry: I mentioned this method above, where heat is added to an enclosure to speed up the drying process. It is quick, but it costs more to set up;
- Dehumidifier: The kiln uses a dehumidifier instead of a heater. These can cost more and take just as much time to set up as a heated kiln;
- Solar kiln: In recent years, I have read about kilns that use heat from the sun. These are only as effective as the weather permits, so I never considered one myself.
I have read about other methods as I learned how to dry wood fast for woodworking projects, but these designs are those I find in reach of most hobbyists.
How to dry wood for furniture
The first time I had wood warp on me was when I was nearing completion on an end table. My frustration at hours of hard work down the drain made me realize I had to learn how to dry wood fast for woodworking to avoid that happening again.
While you might hear of woodworking turning objects made from greenwood, or traditional woodworkers having a good with wet timber, I find it frustrating to work.
Furniture pieces usually have tops made from several boards butted against each other or have thin tapered legs. When building furniture pieces, learning how to dry wood fast for woodworking is critical to avoid cracking, snapping, and warping.
Steps I would suggest taking include:
- Get a moisture meter: Using one of these calculates the moisture level of a piece of wood instead of me guessing;
- Use your home's heating: I love drying wood during the cold months because the air in my home is dry;
- Be patient: Wood furniture projects are delicate, so you must wait until the lumber is stable before shaping it.
Depending upon the climate you live in, moisture ranges can go from as high as 16-percent and drop to as low as 7-percent. Just remember, learning how to dry wood for furniture is easier than repairing or replacing lumber on your project.
How do you kiln dry wood without a kiln?

- Rough saw and store the green wood outside: You will get better air circulation outdoors around the wood slices compared to a basement, and you can cover the top of the pile to prevent sun damage;
- Create increased air circulation: Air drying can be quick if you expose the entire surface to circulation. Use stickers to create space between layers of wood and between the pile and the floor. I have used a fan to increase air movement indoors;
- Bring wood indoors to reach EMC: As your outdoor woodpile reaches 16-percent or less moisture content, bring it indoors to reach Equilibrium Moisture Content. EMC is the point at which your lumber will not gain or lose moisture in the atmosphere.
Answering how do you kiln dry wood without a kiln depends on what you can set up at home. It will also depend on dried wood size your project needs. I have read about woodworkers using their ovens and microwaves to dry out small dry wood slices.
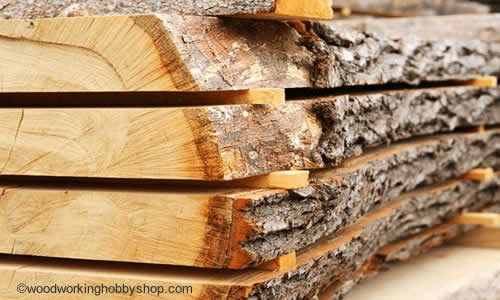
Drying live edge slabs

Depending on the wood species live edge timber makes for a great woodworking project especially if thats going to be a large piece of featured furniture.
Some things to keep in mind to keep your wood piece is in condition as it dries include:
- Use stickers: Do not sit your slab on the ground or floor. Proper airflow will promote even drying and prevent warps and cracks in the treated wood;
- Prepare to let it sit: Remember the one year to dry one-inch drying time rule I mentioned before. You might even go longer, depending upon the level your moisture meter is registering;
- Do not use accelerated drying methods until you're down to 20-percent wood moisture: Waiting until the live edge slab is at 20-percent reduces the chances of damage like splits and ruining the wood finish. You can then transfer the slab to a kiln for a few months until the moisture level drops to around 10-percent, give or take.
When learning how to dry wood fast for woodworking, you will want to use weight to keep timber straight. That might not be as critical for slabs two or more inches thick, but thin cut live edge slabs can benefit from being weighted down.
This can be particularly critical if you're drying an end grain wooden piece
Do not panic if the color changes a during the drying process. The color should return after sanding without having to use wood stain.
Well seasoned wood and dry lumber will be easy to work with and easy to glue up. Enjoy your woodworking!
Need more great Woodworking How To Content? Woodworking Joints And When To Use Them

Leave a Reply