Last Updated on 2021-03-23 by Harry Masterton


How To Make A Wood Butt Joint
If you are new to woodworking and wood joinery, the wood butt joint will be one of the first joints you will learn to make and comes at the other end of the scale to the dovetail joint or even the relatively simpler lap joint. The joinery is something that you have probably already done, even if you are not sure how to make a wood butt joint.
A wood butt joint connects two pieces of wood, usually with the end of one board placed on the face of a second. Shaping your boards for a wood butt joint is simple, as you only need to cut an end piece so that it will sit flush on the face of the other board and becomes an edge joint.
The wood butt joint is a beginner-level joinery technique that provides minimal holding capabilities. You will use glue, fasteners, or a combination of both to hold the pieces of wood together. It is a fast and easy joinery technique you can use for projects that will not place lots of tension on the joint itself.
See our complete rundown – Woodworking Joints and When To Use Them – for more woodworking joints hints and tips.
What follows is a variety of methods on how to make a wood butt joint. There should be one or more methods to create a wood butt joint that you can try on your next DIY project around your home or wood shop.
8 Ways To make A Butt Joint
Glued Only
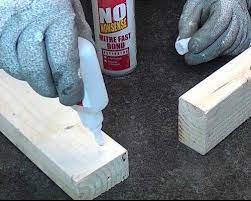 The easiest and weakest wood butt joint uses glue only. It is the Least-durable woodworking joint because the end grain tends to soak up the wood glue as it is applied. That makes the wood joint easy to break, especially with seasonal expansion and shrinkage.
A glue block or indeed several glue blocks will help to reinforce the joint when placed on the inside of the 90 degree corner
Glued With Nails
Screwed Butt Joint and Plugs
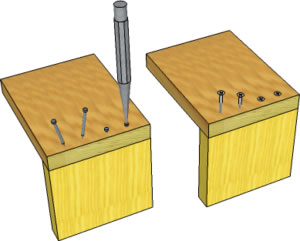
Using screws in the wood butt joint increases its holding power due to the threads digging into the end grain. Drilling out a plug allows you to sink the head of the screw, then cover it with wood. Remember to keep the grain aligned.
Pocket Joint
Fasteners placed at an angle in the wood are how to make a butt joint hold better with less work. A pocket hole jig and clamps allow you to drill accurately and fast. Driving pocket hole screws in from an interior surface keeps exposed faces clean.
Biscuits
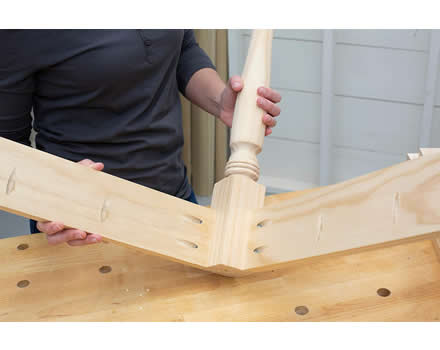
Using biscuit joiner provides gluing along some of the grain on the butt end of your board. That will allow the glue to set better. Having the extra contact surface of the biscuit will also increase the hold of the joint.
Dominos
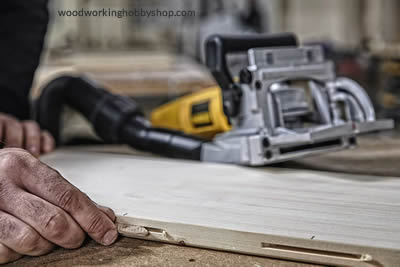
Using a domino machine instead of a biscuit for your wood butt joint provides a tenon shape for extra glue contact. The domino provides more depth but is not as wide as a biscuit. That can be advantageous on thinner lumber.
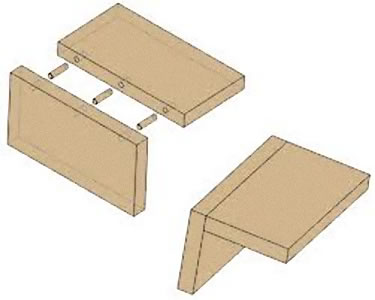
Dowel Joint and Hidden Dowels – A Dowel Reinforced Butt Joint
Spline
You can cut a notch across both pieces using your table saw. Inserting a spline across the length of the boards gives additional holding strength.
How To Make A Butt Joint Video
What Tools Are Used For Making Butt Joints?
Tenon saw
When it comes to what tools are used for making butt joints, this backsaw provides woodworkers with fast cuts on the end of boards. Traditionally used for cutting tenons for mortise and tenon joinery, the 10 to 14 Teeth Per Inch (TPI) will make the clean crosscuts needed for a gluing surface on your butt joints.
Low-angle Block Plane
No matter what type of saw you use to cut your lumber, the end grain will need cleaning. A low-angle block plane can produce a smooth surface on end grain. You can flatten edges to create the 90-degree angle for a wood butt joint to align for frames or box sides.
Chop Saw
Cutting 90-angles on boards can be time-consuming if you have to make repeated cuts throughout the day. The chop saw is perfect for wood butt joint construction on job sites or in manufacturing settings.
Sandpaper
Sanding sheets are easy to overlook when determining what tools are used for making butt joints. Your sandpaper will smooth out rough surfaces for even mating. It will also knock down end grain fibers evenly if used on a sanding block or a powered sander.
Mitered Butt Joint
You might be considering a wood butt joint for your next project, but exposed end grain from one side of the joinery may be unattractive to you. A mitered butt joint or mitre joint can improve the appearance of your joinery, as it hides the end grain of both boards. The mitered butt joint uses two boards with 45-degree cuts on the ends.
Both ends press together to create a 90-degree corner without exposed ends. You can use a mitered butt joint with other angles to create joinery for irregular shapes, like a five-sided frame, for example. The strength is similar to that of a standard wood butt joint that uses 90-degree mating.
It does offer more surface area for gluing due to the angle, but that does not increase the strength of the mitered butt joint since it is mates on the end grain of both pieces of wood.
What Tools Do You Need To Make A Miter Joint?
Miter Square
When it comes to what tools do you need to make a miter joint, this square is a must-have. You can mark or check a 45-degree angle (or the supplementary 135-degree angle). A combination square can layout 45 and 90-degree angles.
Tenon Saw and Miter Block
The combination block and saw are perhaps the simplest to use. A block holds the work piece in place while you insert the saw into an angled slot to cut.
Circular Saw or Compound Miter Saw
You can use the circular saw to cut your wood butt joint by setting it to a 45-degree angle. The nice thing about a circular saw is that you can quickly set irregular angles for projects with more than four sides.
Table Saw
The table saw is the most accurate option on the list of what tools do you need to make a miter joint. You can use a miter gauge or sled to make highly-accurate cuts.
Sander
It is possible to make this type of wood butt joint with a sander or sanding block. The process will take longer, and you may struggle with the angles, however.
How To Make A Mitered Butt Joint – 5 Ways To make a Miter Joint
The method that many woodworkers start with is assembling this wood butt joint using glue and nails. You can start by drilling a pilot hole into the wood pieces before you make the miter. That will make assembling this 45 degree butt joint easy and prevent possible splitting when driving the nails deep into the end grain.
Pin Nailer
If you are looking at how to make a mitered butt joint quickly, the pin nailer might be the tool for you. Most models are pneumatic, allowing you to use your air tank to drive the fasteners into this wood butt joint. The pin nailer uses small-headed brad nails that hold the wood in place, leaving a barely visible head below the surface.
Mitered Gusset
Adding a gusset is one answer to how to make a mitered butt joint stronger. You can add a block of wood to the joinery along the hidden interior surfaces. The added material provides more contact surfaces for glue or fasteners to fit into (although adding nails or screws will affect the appearance of the wood butt joint unless you use plugs to cover them).
Mitered Spline
You can use splines to connect the pieces of your 45 degree butt joint. Cutting notches across the joint provides a groove that you can insert a spline through. Since the splines are visible, many woodworkers use contrasting colors of wood to create a decorative look to the splines (the grooves are usually spaced similarly over all joints on the same project, as well).
Hidden Mitered Spline
Adding a spline to your 45 degree butt joint will add a lot of strength to it, as the spline provides more gluing surface and connection between each piece of wood. You can make the grooves using your table saw, which allows for repeatable cuts that will match when the wood butts together. The mitered spline is good for reinforced butt joints on plywood and other sheet goods.
How To Join Two Pieces of Wood at 90 Degrees
You might wonder how to join two pieces of wood at 90 degrees while they set. A simple wood butt joint needs support as the glue dries. Your pieces of wood will also need to stay aligned when using fasteners. One answer is to use something with a 90-degree angle that your pieces of wood can sit against while the glue sets or you drive the fasteners. Woodworkers can use lumber with perpendicular faces in a corner or a speed square to maintain alignment.
There are also specialty items that you can purchase and jigs that you can make that will hold the wood butt joint secure. When it comes to how to join two pieces of wood at 90 degrees, bands and specialty clamps are a popular choice.
90 Degree Clamps
Band clamp
These 90 degree clamps are also called strap clamps. You place corner pieces on all joints of a box or frame before placing a strap around all sides. A pulley tightens the straps tight, and the corner pieces apply pressure as your glue dries.
Corner Clamp
A better wood butt joint can be created using corner clamps. The clamp holds each piece of the wood perpendicular to one another. You can use a crank or knob to apply pressure on one side of the wood to hold it in place.
The Right-angle Clamp
These products are almost identical to other 90 degree clamps like the corner clamp. The mechanics are the same, except that these clamps use a screwdriver-type handle and a machined insert to create precision support for the wood butt joint. Many products use corner and right-angle names interchangeably in their descriptions, however.
No If, And, Or Butts: Try The Wood Butt Joint On Your Next Project
It may not be the strongest joinery you can use, but the wood butt joint is perhaps one of the easiest to learn and master. The nice thing is, you can learn how to make a wood butt joint stronger without having to learn difficult instructions or buy special tools unusable on other projects.
A standard wood butt joint is a good option for interior framing of cabinetry or simple box designs (such as planters or raised garden beds) for home use. Learning how to make a wood butt joint with mitered ends will allow you to use it on drawers or edging on furniture pieces.
You can reinforce the wood butt joint to handle some torque by adding a gusset or splines. These joints can be useful on bed frames and exterior surfaces. An often-overlooked advantage to this wood joint is how easily it can come apart. That is advantageous on projects that are temporary in nature, such as stage work or backyard projects.
In this wood joint how to series we will be discussing how to make the bridle joint, dovetail joint, lap joint and half lap joint, the tenon joint and dado. We will also look at how to make the rabbet, the box joint, finger joint and groove joint. The groove joint is similar to a dado joint.
The main difference being the dado runs across the grain where the groove runs along the grain normally close to or actually running on the edge.
Later in the series we'll take a detailed look at the biscuit joint and how to make those using a biscuit jointer.
We'll also cover the sliding dovetail and half blind dovetail using a dovetail jig.
If you think that the butt joint is only useful to novice woodworkers and children's projects, you might want to reevaluate the potential of this ancient joinery technique!
See our complete rundown – Woodworking Joints and When To Use Them – for more woodworking joints hints and tips.


Leave a Reply